Project OMC

Status: In Progress

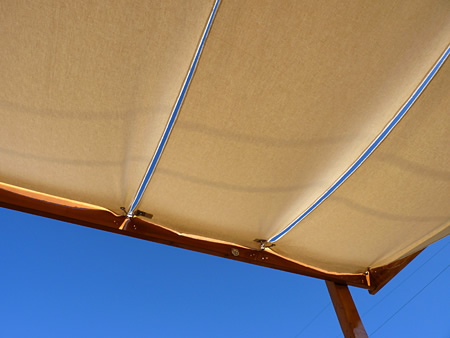
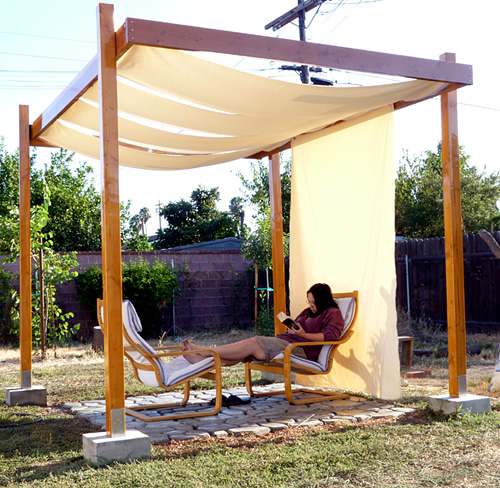
This project is my attempt at making my own version of a pergola that is adjustable to various needs with zero maintenance. The original plan involved a non-removable top made out of canvas and held down with stainless steel hardware. I also wanted it to be very sturdy with little or no wobble in the posts. Everything that Home Depot and Lowe's had was either too ugly or just not sturdy enough. My only choice was to make something from scratch.

The total cost for this project was very low at under $250. I can't provide an exact figure because I bought more screws than I actually needed to build it. Buying them in bulk was cheaper and I now have extra screws for future projects. I also have some Spar Varnish and UV/sealer left over for future use.

Pergola with canvas top.
Work area before preparing for the footings.
Work area before preparing for the footings. Seven 3.5in. x 1ft. Stainless Steel flat bars. One of them is 304 & the other six are 316L. Close up of the mill finish on the 316L Stainless Steel flat bar. Cobalt Steel Drill bit used in aircraft manufacturing. Cuts through Stainless Steel like butter! This is only the first phase of the finish. Twelve Stainless Steel screws secure each post. First footing complete and lining up the second one. Second footing poured with about 200 lbs. of concrete.

Mmmmm Stainless Steel...

The most expensive part of this project was all of the stainless steel involved. I don't live near the ocean so rust was not an issue. Well sort of... For some reason, Hot-dip Galvanized fasteners start rusting within one year in my backyard. I am actually conducting a test right now and the screws I placed out there are starting to rust after only 9 months! I didn't want my footings to look old and tarnished after only 1 year. Also, stainless steel just looks nicer than the galvanized products that most hardware stores sell.

Each footing is comprised of 250lbs. of steel reinforced concrete. Each footing is exposed 6 inches above ground and 12 inches underground. I used 3.5 inch stainless steel flat bars, embedded in the concrete, to hold each post in place. Seven of them were 316L and one was 304 just for fun. Each screw hole was hand drilled with a corded handheld 950rpm power drill. If you've ever tried to drill in hard metals by hand, you know exactly how hard it is to do it accurately. But I got very good at it in a hurry. I am proud to say that except for the first two, every hole was within 1mm of its target. By the time I worked on the final flat bar, all of those holes were within 1/2mm of their target. I used cobalt steel drill bits that are used for aircraft manufacturing and they cut through stainless steel like butter. Each flat bar ended up with a matte finish that was just shy of mirror. I went against a mirror finish because finger prints and smudges were too visible.

Passivation

A few weeks after completing 3 of the footings I noticed that a few of the embedded flat bars started showings signs of rust. And one of them in particular had some large dark blotch stains. Obviously, they had been contaminated by my supplier when they were cut to my desired length. Also, in the process of lapping the flat bars, I may have removed the passive film that protects stainless steel from further oxidation. Stainless steel is different from normal carbon steel because it contains about 11% chromium. This chromium forms a passive film of chromium oxide, which helps prevent further surface corrosion and blocks corrosion from spreading into the steel's internal structure. Solution? Passivation.

ASTM A380 defines passivation as “the removal of exogenous iron or iron compounds from the surface of a stainless steel by means of a chemical dissolution, most typically by a treatment with an acid solution that will remove the surface contamination but will not significantly affect the stainless steel itself.” Although nitric acid is typically used in the process, using such a toxic chemical was not an option in my backyard. In my case, I only used citric acid and the results were exactly what I needed. Rust and the blotches that I was seeing never materialized again.

Gloves required. 100% PURE Citric acid will irritate your skin.
Gloves required. 100% PURE Citric acid will irritate your skin. Citric acid is much safer to use than nitric acid. A close up look at the finish. Each screw was used in a predrilled hole injected with silicon for a water tight seal. A look at the final finish after passivation.
Close up of the finished redwood with stainless steel hardware.
Close up of finished redwood with stainless steel hardware. The Douglas-fir posts after 2 coats of UV sealer and 6 coats of Spar Varnish. Each post has a reflector on the top to help reduce surface temperature fluctuations. What better way to survive those Santa Ana winds than to use parts made for sailboats. Stainless Steel grommets for the canvas. Fully assembled and perfectly level.  Each hardware has a silicon gasket and each screw hole was also injected with silicon.  Time to go sailing?

Spar Varnish + Canvas

I used four 8ft Douglas-fir posts, two 10ft. x 5in. pieces of redwood, and two 8ft. x 5in. redwood pieces. Each of one is protected from the elements by two coats of UV sealer and six coats of spar varnish. The application of the spar varnish was the most time consuming process. Each coat had to be very thin and I had to wait a few days for each coat to fully cure. I hope that this process will last about 5 years before I have to do any kind of maintenance on the wood.

I chose canvas for the first version because it was cheap (about $30) but I never expected them to last long. To secure the canvas, I used parts that were specifically made for sale boats because they were the most cost effective stainless steel (SS) parts I could find. I used SS 2-3/8" carabiners and 5/16" SS folding pad eyes that have a safe working load of 7,000 lbs! For the canvas I used SS grommets. This makes the canvas very easy to remove. It only takes about 5 minutes to remove it. So far the canvas is already suffering from decay. I hope to make other versions that are made out of more durable materials.

What's left?

For the most part, this project is done. The finish on the wood and the stainless steel are both still flawless. The only issue so far is the canvas. Many of the pieces didn't do very well during this past season's Santa Ana winds. They have started to tear around the grommets. I am currently looking at other materials that would be more durable for this situation. I also plan to use techniques that are used on sails in order to prevent any tears in the fabric. I am looking for something that is durable and rot proof.

Stain